-40%
DIY Mini Spot Welder Machine 18650 Battery Various Welding Power Nickel Steel
$ 3.69
- Description
- Size Guide
Description
HomeElectronic Component
Chips
Sensor
Arduino Module
Raspberry Pi
DIY Mini Spot Welder Machine 18650 Battery Various Welding Power Nickel Steel
Popular
Popular
Product Introduction
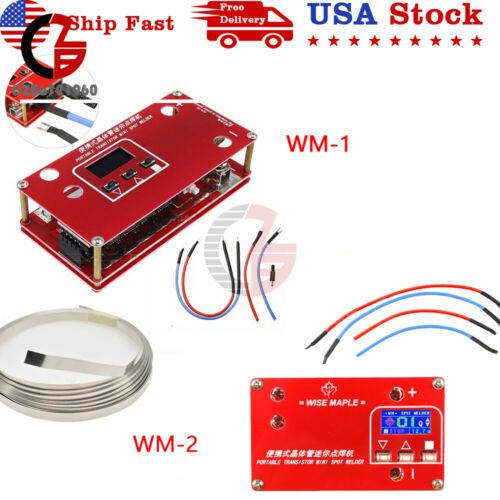
Stand WM-1
Reference description:
Note, read before use:
Battery selection:
1. 12V car battery from 25 to 40ah, requires good performance and low internal resistance
2. 4000 to 6000 mAh 45C to 60C 3S aircraft lithium battery
3. 30 to 35ah 12V capacity lithium battery pack
Selection of welding materials:
0.1-0.12mm thick nickel-plated steel strip
Energy setting
The energy must gradually increase from 01, and the maximum cannot exceed 50. It is recommended that the energy be below 30
Exceeding the above conditions may damage the controller!
Instructions for use:
1. Power wiring
The controller comes with a 20cm long 10AWG input wire, one end has been crimped with the U-shaped terminal, and the other end has not been processed. Connect the crimped U-shaped terminal to the input end of the control power supply, and handle the other end according to your own power supply.
Note, do not connect the positive and negative poles wrong
2. Switch machine
There is a power switch under the control panel. After pressing it, wait for 3 seconds. After the buzzer beeps, the LCD lights up and the boot is completed. Press the power switch again to shut down.
3. Screen description and parameter adjustment
There are currently three parameters on the screen
WELD ENERGY: Welding energy, parameters 01-99
INPUTE: Power supply voltage displays the current input power supply voltage
WELD WAY: Welding method, MANUAL manual and AUTO automatic
Welding energy adjustment: can be adjusted directly by pressing the up and down buttons
Welding method selection: can be switched by the third button
4. Welding
Press the welding pen obliquely onto the nickel strip to keep the welding needle clean.
According to the actual test, if the welding needle is ground into a round head, the welding effect can be improved
There are two ways of welding: manual and automatic.
In manual mode, you can make a trigger switch by yourself. The plug of the controller can be plugged into the manual trigger socket of the controller. Each time you press the trigger switch, the buzzer will sound twice to complete one welding.
In the automatic mode, when the two welding pins touch the nickel strip, there is a delay of 1 second, the buzzer emits three beeps, and one welding is automatically completed.
Common problem:
If the spot welder of this version cannot be welded or welded firmly! Generally, it is the following situations:
1. The battery or the power supply current is too small: the principle of spot welding is that the short-circuit power supply produces high-temperature molten metal materials for welding. If the power supply current is too small, the welding will not be possible, or the effect will not be good!
2. The wiring is not connected properly. Because there is a large current. The wiring must be screwed to the power supply. And the contact area should be as large as possible, if you use a clamp to clamp the battery, or use a wire to screw on the electrode It is absolutely impossible to have a good effect!
3. Improper gear setting. The board is equipped with 50 gears. Generally, it is recommended to reach 30. For a small discharge current, use a higher gear. If it is adjusted to 30 and the point is not strong, it proves that the battery current is too small and only Replace the battery with better performance! Or check the connection. Is it connected?
4. For operation: you need to press 2 soldering pens together on the nickel sheet, press and hold, there will be a current output in about a second, and you can take it off immediately if you can’t click it! Note, just tap it, welding The pen and the nickel sheet are at a 45-degree angle.
5. Be sure to choose the right battery, the energy adjustment needs to be increased step by step, otherwise it will be very easy to blow up the MOSS tube
6. Note that only nickel sheet steel strips can be welded
Specifications:
Material: Metal
Input line length: app.20cm/7.87in
Length of welding pen: app.30cm/11.81in
Color: Red+Blue+Black
Battery: lithium battery(not included)
Quantity: 1Set
Package Included:
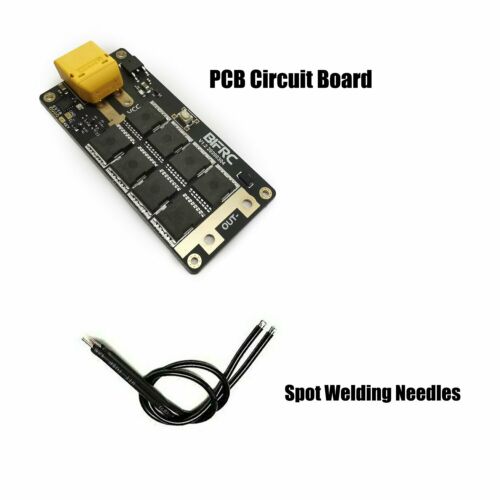
1x Controller
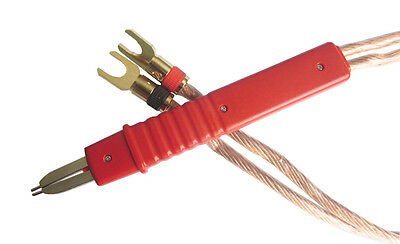
1x Welding pen
1x Power input line (Red and Blue)
1 Pair x U-shaped cold-pressed terminal (used to connect to input power)
Several heat-shrinkable tubes, used to shrink the power input line
Notes:
Please allow 1-3 cm difference due to manual measurement.
Due to light and screen difference, the item's color may be slightly different from the pictures.
Upgerade version
WM-2
Reference description:
Features:
Brand new LCD display interface, more intuitive and clearer data display
Brand new MOSFET drive design, providing greater drive current and switching speed
Re-layout of components, more reasonable PCB design
Adopt 4MOSFET design to minimize the problem of MOSFET mismatch
Power supply selection
1: 12V car battery from 25 to 40ah, requires good performance and small internal resistance
2: 4000 to 6000mAh 45C to 60C 3S model airplane lithium battery
3:30 to 35ah 12V capacity lithium battery pack
Note: Can not use super capacitor as power supply
Welding nickel strip selection
The thickness of the welded nickel strip should be 0.1 to 0.12mm
Exceeding this thickness may cause the MOS tube to burn out
Energy setting
The energy must gradually increase from 01, and the maximum cannot exceed 30. It is recommended that the energy be below 30.
Exceeding the above conditions may damage the controller!
Switch machine
In the shutdown state, long press the square button, the buzzer will beep three times, and the controller will turn on
In the power-on state, long press the square button, the buzzer will beep twice, and the controller will shut down
parameter settings
There is only one parameter that needs to be set to control the welding energy. The larger the parameter setting, the higher the welding energy.
In the power-on state, use the up and down triangle buttons to set the welding energy parameters
Mode selection
There are three working modes for control STOP MANUL AUTO
STOP: In this state, the controller cannot be welded
MANUL: manual welding mode, welding through an external trigger switch
AUTO: automatic welding, when the soldering pen touches the nickel strip, the delay is 1 second, and the welding is automatically completed
Welding operation
Select the automatic mode, set the energy to 1 first, and then put the nickel belt on the test machine (don’t weld the battery yet)
If the welding is not possible, gradually increase the energy until it can be welded, do not increase the energy
Before completing the welding, make sure that the soldering pen is firmly crimped onto the nickel strip, otherwise it will blow through.
common problem:
1: Cannot be welded
the reason:
Generally, the battery capacity is too small and the ability to release current is insufficient
Nickel belt is too thick
Solution:
Choose a battery that meets the requirements
Welding nickel tape between 0.1mm and 0.12mm
2: Welding explosion fire, nickel belt perforation
the reason:
Too much energy
The soldering pen is not firmly pressed
There are flammable materials under the nickel belt
Solution:
Energy down
During the welding process, keep the welding needle completely firmly crimped on the nickel strip
During the welding process, no flammable materials must be placed under the nickel belt
3. MOS tube burned out during welding
the reason:
Battery capacity is too large
Nickel belt is too thick
Solution:
Choose a battery that meets the requirements
Welding nickel tape between 0.1mm and 0.12mm
Package Included:
Controller X1
Soldering pen X2
Power cord X2
Manual X1
-------------------------------------------------------------------------------------------------------------
Nickel Sheet Plate
Description:
18650 Nickel Plated/Connected Plate
Main application: battery connection sheet, lead-out sheet, the product is mainly used in nickel-metal hydride batteries, lithium batteries, tabs, power tools, battery packs, polymer batteries, power batteries and instrumentation, telecommunications, vacuum, special light bulbs and other industries.
Material:Nickel
Size:thickness*width*length
0.1*5MM*10M
Package included:
1 X 10M 18650 Li-ion Battery Nickel Sheet Plate
Payment
Shipping
Refund
Payment
We accept PayPal only.
But we only
Accept
your
Ebay Address
,Please Make sure it's 100% right.
Payment must be received in 5 business days of auction closing.
Please leave note for your special request (e.g. Colors or Size) in PayPal when you pay the order.
Any special request cannot be accepted after 24 hours of payment, because most of orders will be processed instantly and same day dispatched.
Shipping
We maintain high standards of excellence and strive for 100% customer satisfaction! Feedback is very important to us. We request that you contact us immediately BEFORE you give us neutral or negative feedback, so that we can satisfactorily address your concerns.
Refund
All package need to
wait 30 days
(US only n
eed 7-10 days)
,
Please take care it.Less than 30 days,we can't take a refund
.
If the item is defect when you receive it or you are not satisfied with it, please return it within 14 days for a replacement or money back. But the items must be back in factory condition. Please contact us and double check the return address before you return it.
If is item is defective in 12 months, you can return it to us. We will send you a new replacement after receiving the defective item.
Home
Electronic Component
Chips
Sensor
Arduino Module
Raspberry Pi
DIY Mini Spot Welder Machine 18650 Battery Various Welding Power Nickel Steel
Product Introduction
Stand WM-1
Reference description:
Note, read before use:
Battery selection:
1. 12V car battery from 25 to 40ah, requires good performance and low internal resistance
2. 4000 to 6000 mAh 45C to 60C 3S aircraft lithium battery
3. 30 to 35ah 12V capacity lithium battery pack
Selection of welding materials:
0.1-0.12mm thick nickel-plated steel strip
Energy setting
The energy must gradually increase from 01, and the maximum cannot exceed 50. It is recommended that the energy be below 30
Exceeding the above conditions may damage the controller!
Instructions for use:
1. Power wiring
The controller comes with a 20cm long 10AWG input wire, one end has been crimped with the U-shaped terminal, and the other end has not been processed. Connect the crimped U-shaped terminal to the input end of the control power supply, and handle the other end according to your own power supply.
Note, do not connect the positive and negative poles wrong
2. Switch machine
There is a power switch under the control panel. After pressing it, wait for 3 seconds. After the buzzer beeps, the LCD lights up and the boot is completed. Press the power switch again to shut down.
3. Screen description and parameter adjustment
There are currently three parameters on the screen
WELD ENERGY: Welding energy, parameters 01-99
INPUTE: Power supply voltage displays the current input power supply voltage
WELD WAY: Welding method, MANUAL manual and AUTO automatic
Welding energy adjustment: can be adjusted directly by pressing the up and down buttons
Welding method selection: can be switched by the third button
4. Welding
Press the welding pen obliquely onto the nickel strip to keep the welding needle clean.
According to the actual test, if the welding needle is ground into a round head, the welding effect can be improved
There are two ways of welding: manual and automatic.
In manual mode, you can make a trigger switch by yourself. The plug of the controller can be plugged into the manual trigger socket of the controller. Each time you press the trigger switch, the buzzer will sound twice to complete one welding.
In the automatic mode, when the two welding pins touch the nickel strip, there is a delay of 1 second, the buzzer emits three beeps, and one welding is automatically completed.
Common problem:
If the spot welder of this version cannot be welded or welded firmly! Generally, it is the following situations:
1. The battery or the power supply current is too small: the principle of spot welding is that the short-circuit power supply produces high-temperature molten metal materials for welding. If the power supply current is too small, the welding will not be possible, or the effect will not be good!
2. The wiring is not connected properly. Because there is a large current. The wiring must be screwed to the power supply. And the contact area should be as large as possible, if you use a clamp to clamp the battery, or use a wire to screw on the electrode It is absolutely impossible to have a good effect!
3. Improper gear setting. The board is equipped with 50 gears. Generally, it is recommended to reach 30. For a small discharge current, use a higher gear. If it is adjusted to 30 and the point is not strong, it proves that the battery current is too small and only Replace the battery with better performance! Or check the connection. Is it connected?
4. For operation: you need to press 2 soldering pens together on the nickel sheet, press and hold, there will be a current output in about a second, and you can take it off immediately if you can’t click it! Note, just tap it, welding The pen and the nickel sheet are at a 45-degree angle.
5. Be sure to choose the right battery, the energy adjustment needs to be increased step by step, otherwise it will be very easy to blow up the MOSS tube
6. Note that only nickel sheet steel strips can be welded
Specifications:
Material: Metal
Input line length: app.20cm/7.87in
Length of welding pen: app.30cm/11.81in
Color: Red+Blue+Black
Battery: lithium battery(not included)
Quantity: 1Set
Package Included:
1x Controller
1x Welding pen
1x Power input line (Red and Blue)
1 Pair x U-shaped cold-pressed terminal (used to connect to input power)
Several heat-shrinkable tubes, used to shrink the power input line
Notes:
Please allow 1-3 cm difference due to manual measurement.
Due to light and screen difference, the item's color may be slightly different from the pictures.
Upgerade version
WM-2
Reference description:
Features:
Brand new LCD display interface, more intuitive and clearer data display
Brand new MOSFET drive design, providing greater drive current and switching speed
Re-layout of components, more reasonable PCB design
Adopt 4MOSFET design to minimize the problem of MOSFET mismatch
Power supply selection
1: 12V car battery from 25 to 40ah, requires good performance and small internal resistance
2: 4000 to 6000mAh 45C to 60C 3S model airplane lithium battery
3:30 to 35ah 12V capacity lithium battery pack
Note: Can not use super capacitor as power supply
Welding nickel strip selection
The thickness of the welded nickel strip should be 0.1 to 0.12mm
Exceeding this thickness may cause the MOS tube to burn out
Energy setting
The energy must gradually increase from 01, and the maximum cannot exceed 30. It is recommended that the energy be below 30.
Exceeding the above conditions may damage the controller!
Switch machine
In the shutdown state, long press the square button, the buzzer will beep three times, and the controller will turn on
In the power-on state, long press the square button, the buzzer will beep twice, and the controller will shut down
parameter settings
There is only one parameter that needs to be set to control the welding energy. The larger the parameter setting, the higher the welding energy.
In the power-on state, use the up and down triangle buttons to set the welding energy parameters
Mode selection
There are three working modes for control STOP MANUL AUTO
STOP: In this state, the controller cannot be welded
MANUL: manual welding mode, welding through an external trigger switch
AUTO: automatic welding, when the soldering pen touches the nickel strip, the delay is 1 second, and the welding is automatically completed
Welding operation
Select the automatic mode, set the energy to 1 first, and then put the nickel belt on the test machine (don’t weld the battery yet)
If the welding is not possible, gradually increase the energy until it can be welded, do not increase the energy
Before completing the welding, make sure that the soldering pen is firmly crimped onto the nickel strip, otherwise it will blow through.
common problem:
1: Cannot be welded
the reason:
Generally, the battery capacity is too small and the ability to release current is insufficient
Nickel belt is too thick
Solution:
Choose a battery that meets the requirements
Welding nickel tape between 0.1mm and 0.12mm
2: Welding explosion fire, nickel belt perforation
the reason:
Too much energy
The soldering pen is not firmly pressed
There are flammable materials under the nickel belt
Solution:
Energy down
During the welding process, keep the welding needle completely firmly crimped on the nickel strip
During the welding process, no flammable materials must be placed under the nickel belt
3. MOS tube burned out during welding
the reason:
Battery capacity is too large
Nickel belt is too thick
Solution:
Choose a battery that meets the requirements
Welding nickel tape between 0.1mm and 0.12mm
Package Included:
Controller X1
Soldering pen X2
Power cord X2
Manual X1
-------------------------------------------------------------------------------------------------------------
Nickel Sheet Plate
Description:
18650 Nickel Plated/Connected Plate
Main application: battery connection sheet, lead-out sheet, the product is mainly used in nickel-metal hydride batteries, lithium batteries, tabs, power tools, battery packs, polymer batteries, power batteries and instrumentation, telecommunications, vacuum, special light bulbs and other industries.
Material:Nickel
Size:thickness*width*length
0.1*5MM*10M
Package included:
1 X 10M 18650 Li-ion Battery Nickel Sheet Plate
Payment
Shipping
Refund
Payment
We accept PayPal only.
But we only
Accept
your
Ebay Address
,Please Make sure it's 100% right.
Payment must be received in 5 business days of auction closing.
Please leave note for your special request (e.g. Colors or Size) in PayPal when you pay the order.
Any special request cannot be accepted after 24 hours of payment, because most of orders will be processed instantly and same day dispatched.
Shipping
We maintain high standards of excellence and strive for 100% customer satisfaction! Feedback is very important to us. We request that you contact us immediately BEFORE you give us neutral or negative feedback, so that we can satisfactorily address your concerns.
Refund
All package need to
wait 30 days
(US only n
eed 7-10 days)
,
Please take care it.Less than 30 days,we can't take a refund
.
If the item is defect when you receive it or you are not satisfied with it, please return it within 14 days for a replacement or money back. But the items must be back in factory condition. Please contact us and double check the return address before you return it.
If is item is defective in 12 months, you can return it to us. We will send you a new replacement after receiving the defective item.
